Image processing to reduce the noise produced by small sensors or high ISOs.
Noise is caused by random variations in the light captured by each photosite (pixel) on the sensor. Some cameras have sensors which apply 'on-chip' noise reduction, where electronic circuitry adjusts the signal values captured by the sensor's photosites. This is probably the best sort.
Otherwise, noise reduction is applied by the camera to the raw image data as it's processed to produce the photo. This reduces noise, but can result in smudging and loss of detail.
The same applies to noise reduction processes applied using software on a computer, though with more processing power available and more time to find the best settings, this may produce better results.
In any event, noise reduction is something you'd rather wasn't necessary at all. Using a small sensor and applying noise reduction is not as good as using a larger sensor which doesn't need it.
Showing posts with label Sensors. Show all posts
Showing posts with label Sensors. Show all posts
Tuesday, 11 January 2011
Friday, 31 December 2010
Sensor size
Different types of digital camera use different sized sensors. The larger the sensor, the better the picture quality, though the cost increases too. This diagram shows the common sizes:
Apart from specialised studio cameras, the largest are in full-frame digital SLRs, the next largest are in the more common 'APS-C' format SLRs and Micro Four Thirds hybrid cameras, while the smallest are in compact cameras.

The physical size of a sensor is now more important for picture quality than its megapixel rating. With a small sensor, the image has to be enlarged by much more to produce a same-sized print etc. It's like the difference between small negatives and big negatives in the days of film.
There are also technical problems with small sensors that have high megapixel ratings. The tiny pixels on these sensors are nowhere near as sensitive to light and they produce much more random noise than the larger pixels on bigger sensors. This means the makers have to build in strong noise reduction processes, which gives photos a soft and hazy look.
In fact while the resolution of compact cameras has climbed steadily over the past few years, it's probably fair to say that the actual picture quality has stayed the same or even gone backwards.
The bigger the sensor, the better the picture quality, and the gain in quality is pretty much proportional to the sensor size. The table below shows that you don't need that many megapixels to produce good-quality prints, but that the enlargement factor with small sensors is many times higher. Enlargements of up to 30x are usually fine (indicated in green), but when you go beyond this, the definition starts to suffer. There is a limit to how much any lens can resolve, and how much you can blow up the image it produces.

So megapixels are no longer particularly relevant for compact cameras because they've already reached the point where more isn't making any difference, and in fact may be making things worse.
Because the sensors in digital SLRs are much larger, there is still something to be gained from higher megapixel counts, though even here there are signs that diminishing returns are setting in.
Apart from specialised studio cameras, the largest are in full-frame digital SLRs, the next largest are in the more common 'APS-C' format SLRs and Micro Four Thirds hybrid cameras, while the smallest are in compact cameras.

The physical size of a sensor is now more important for picture quality than its megapixel rating. With a small sensor, the image has to be enlarged by much more to produce a same-sized print etc. It's like the difference between small negatives and big negatives in the days of film.
There are also technical problems with small sensors that have high megapixel ratings. The tiny pixels on these sensors are nowhere near as sensitive to light and they produce much more random noise than the larger pixels on bigger sensors. This means the makers have to build in strong noise reduction processes, which gives photos a soft and hazy look.
In fact while the resolution of compact cameras has climbed steadily over the past few years, it's probably fair to say that the actual picture quality has stayed the same or even gone backwards.
The bigger the sensor, the better the picture quality, and the gain in quality is pretty much proportional to the sensor size. The table below shows that you don't need that many megapixels to produce good-quality prints, but that the enlargement factor with small sensors is many times higher. Enlargements of up to 30x are usually fine (indicated in green), but when you go beyond this, the definition starts to suffer. There is a limit to how much any lens can resolve, and how much you can blow up the image it produces.

So megapixels are no longer particularly relevant for compact cameras because they've already reached the point where more isn't making any difference, and in fact may be making things worse.
Because the sensors in digital SLRs are much larger, there is still something to be gained from higher megapixel counts, though even here there are signs that diminishing returns are setting in.

SuperCCD EXR | Innovative sensor design from Fujifilm
SuperCCD is a family of sensors developed and used by Fujifilm in its digital cameras. Where other makers opted for a rectangular grid of photosites, Fujifilm designed a hexagonal array which, the company claimed, improved sensitivity and hence high-ISO performance.
Fujifilm's new SuperCCD EXR sensor sticks to the hexagonal photosite array, but a different colour filter arrangement so that same-coloured photosites lie next to each other on diagonal lines. The first camera to use this sensor is the FinePix F200EXR, a compact with a 5x wideangle zoom. The sensor design means images can be processed in three different ways to maximise definition, low-light performance and dynamic range respectively.

This diagram shows the old photosite arrangement (left) and the new EXR arrangement (right). The Fine Capture Mode uses all the pixels for maximum resolution, Pixel Fusion Mode combines adjacent pixels to maximise light-gathering power for improved high-ISO/low light performance, and Dual Capture mode combines exposures from two sets of pixels to produce a high dynamic range result.
The disadvantage of the Pixel Fusion and Dual Capture modes is that because pixels are doubled up, the pictures are only half the resolution. So if the camera captures 16 million pixels in the normal high-resolution mode, you'll get 8-megapixel images in the high-sensitivity and high dynamic range modes.
This is more of a perceived problem than a real one, though. Megapixels are overrated, and 8 megapixels is fine for most needs and the reduction in resolution is well worth it for the extra image quality available in the conditions these modes are designed for.
Fujifilm's new SuperCCD EXR sensor sticks to the hexagonal photosite array, but a different colour filter arrangement so that same-coloured photosites lie next to each other on diagonal lines. The first camera to use this sensor is the FinePix F200EXR, a compact with a 5x wideangle zoom. The sensor design means images can be processed in three different ways to maximise definition, low-light performance and dynamic range respectively.

This diagram shows the old photosite arrangement (left) and the new EXR arrangement (right). The Fine Capture Mode uses all the pixels for maximum resolution, Pixel Fusion Mode combines adjacent pixels to maximise light-gathering power for improved high-ISO/low light performance, and Dual Capture mode combines exposures from two sets of pixels to produce a high dynamic range result.
The disadvantage of the Pixel Fusion and Dual Capture modes is that because pixels are doubled up, the pictures are only half the resolution. So if the camera captures 16 million pixels in the normal high-resolution mode, you'll get 8-megapixel images in the high-sensitivity and high dynamic range modes.
This is more of a perceived problem than a real one, though. Megapixels are overrated, and 8 megapixels is fine for most needs and the reduction in resolution is well worth it for the extra image quality available in the conditions these modes are designed for.
Aspect ratios | Not all cameras/sensors are the same
A picture's 'aspect ratio' is its proportions, width compared to height. The sensors in digital cameras have different aspect ratios, but you also course choose the aspect ratio of the picture, of course, by cropping it on the computer. Different cameras over the years have used different aspect ratios:

1. Medium-format film cameras took square 6x6cm pictures on 120 or 220 roll film, though some models took 6x7cm or 6x9cm pictures instead. The square aspect ratio does suit many subjects rather well, though it's often overlooked now. You can use Photoshop to crop any image to the square format, of course.
2. The most common aspect ratio today is the 4:3 ratio of compact digital camera sensors and Olympus and Panasonic's Four Thirds cameras. This is also the aspect ratio of conventional (non-widescreen) TVs, so it's ideal for playing back still pictures or movies on your TV at home.
3. Digital SLRs are different. They have a slightly wider 3:2 ratio. This may go unnoticed much of the time, but it makes a difference when ordering prints online. The standard 6"x4" snapshot size is a perfect match for the 3:2 images from a digital SLR, but not the 4:3 images from a compact. Here you need a print size closer to 6"x4.5" or 5.5"x4".
4. The 16:9 'widescreen' ratio offered on some cameras matches the aspect ratio of widescreen TVs, and it also produces very effective compositions with certain types of subject.
1. Medium-format film cameras took square 6x6cm pictures on 120 or 220 roll film, though some models took 6x7cm or 6x9cm pictures instead. The square aspect ratio does suit many subjects rather well, though it's often overlooked now. You can use Photoshop to crop any image to the square format, of course.
2. The most common aspect ratio today is the 4:3 ratio of compact digital camera sensors and Olympus and Panasonic's Four Thirds cameras. This is also the aspect ratio of conventional (non-widescreen) TVs, so it's ideal for playing back still pictures or movies on your TV at home.
3. Digital SLRs are different. They have a slightly wider 3:2 ratio. This may go unnoticed much of the time, but it makes a difference when ordering prints online. The standard 6"x4" snapshot size is a perfect match for the 3:2 images from a digital SLR, but not the 4:3 images from a compact. Here you need a print size closer to 6"x4.5" or 5.5"x4".
4. The 16:9 'widescreen' ratio offered on some cameras matches the aspect ratio of widescreen TVs, and it also produces very effective compositions with certain types of subject.
Sensor cleaning
How to use 'dry' cleaning for dust, 'wet' cleaning for stubborn spots and smears.
The sensors in digital SLRs do sometimes need cleaning. The usual problem is dust spots, and although many cameras now have dust removal systems which briefly vibrate the sensor (or a filter in front) to dislodge any dust, these are not always effective. Some dust is just too 'sticky'.
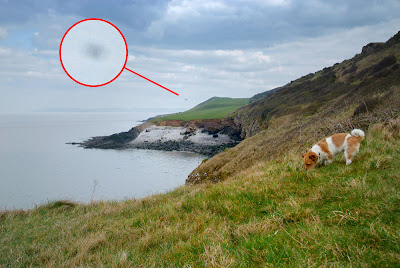
Cameras without in-built sensor-cleaning systems are more prone to dust spots, and the image above shows what they look like (dark, diffuse spots).

Sometimes, the sensor can also pick up smears. These aren't as obvious in their effects as dust spots, but can cause subtle streaking effects or reduced resolution and contrast. Smears may be caused by lubricant spraying from the mirror mechanism (a problem on some Canon cameras, illustrated above), or by previous cleaning attempts. If you're not careful when using a sensor swab, you can drag lubricants from around the sensor mount and on to the sensor surface itself.
Depending on the problem (dust or smears), there are two approaches you can take to sensor cleaning: 'dry' cleaning and 'wet' cleaning.
'Dry' cleaning
This is sometimes done with a blower, but often these simply stir up dust inside the camera body and make the problem worse. Usually, a brush is the best solution, but it has to be a special sort. An ordinary brush, like those sold as camera cleaning accessories, is no good because the fibres collect dust and grease over time. They'll just leave the sensor a whole lot dirtier than it was before.

Instead, you need a specialised sensor brush, like Visible Dust's Arctic Butterfly. This uses electrical charge to pick up dust on the sensor surface, and this charge is generated by spinning the brush (it has a battery and motor) for a period of several seconds before passing it gently across the sensor surface. It may take a few attempts to remove any dust, but the risk of contamination or abrasion damage is much lower.
'Wet' cleaning
This may not be enough, and some people find that a dry clean with a specially-designed sensor 'swab' (below) may shift particles that a brush won't. It's more usual, though, to use swabs as part of a 'wet' clean, in conjunction with a specially-formulated sensor cleaning solvent.

Swabs are shaped like paddles in sizes designed to match APS-C or full-frame sensors (make sure you get the right size). They are sold in individually sealed packages and can only be used one. The fluid you use is crucial too. Ordinary lens cleaning fluid is no good; it has to be proper sensor cleaning fluid.
The trick with sensor cleaning is to stop when you've done enough, but it can be pretty hard to work out when that is with the naked eye. It's usually worth investing in a sensor loupe (below), which combines a magnifying lens with small lamps which illuminated the sensor surface.
If you send your camera away to be professionally cleaned, the technicians will be using the same materials and techniques we're describing here. Hopefully, they'll have the benefit of experience and will do a better job than you could, though you can't always rely on that.
One final word of warning. If you scratch your sensor when cleaning it, it's your responsibility and you will have to pay for a repair, whether or not the camera is still within its warranty period.
The sensors in digital SLRs do sometimes need cleaning. The usual problem is dust spots, and although many cameras now have dust removal systems which briefly vibrate the sensor (or a filter in front) to dislodge any dust, these are not always effective. Some dust is just too 'sticky'.

Cameras without in-built sensor-cleaning systems are more prone to dust spots, and the image above shows what they look like (dark, diffuse spots).

Sometimes, the sensor can also pick up smears. These aren't as obvious in their effects as dust spots, but can cause subtle streaking effects or reduced resolution and contrast. Smears may be caused by lubricant spraying from the mirror mechanism (a problem on some Canon cameras, illustrated above), or by previous cleaning attempts. If you're not careful when using a sensor swab, you can drag lubricants from around the sensor mount and on to the sensor surface itself.
Depending on the problem (dust or smears), there are two approaches you can take to sensor cleaning: 'dry' cleaning and 'wet' cleaning.
'Dry' cleaning
This is sometimes done with a blower, but often these simply stir up dust inside the camera body and make the problem worse. Usually, a brush is the best solution, but it has to be a special sort. An ordinary brush, like those sold as camera cleaning accessories, is no good because the fibres collect dust and grease over time. They'll just leave the sensor a whole lot dirtier than it was before.

Instead, you need a specialised sensor brush, like Visible Dust's Arctic Butterfly. This uses electrical charge to pick up dust on the sensor surface, and this charge is generated by spinning the brush (it has a battery and motor) for a period of several seconds before passing it gently across the sensor surface. It may take a few attempts to remove any dust, but the risk of contamination or abrasion damage is much lower.
'Wet' cleaning
This may not be enough, and some people find that a dry clean with a specially-designed sensor 'swab' (below) may shift particles that a brush won't. It's more usual, though, to use swabs as part of a 'wet' clean, in conjunction with a specially-formulated sensor cleaning solvent.

Swabs are shaped like paddles in sizes designed to match APS-C or full-frame sensors (make sure you get the right size). They are sold in individually sealed packages and can only be used one. The fluid you use is crucial too. Ordinary lens cleaning fluid is no good; it has to be proper sensor cleaning fluid.
The trick with sensor cleaning is to stop when you've done enough, but it can be pretty hard to work out when that is with the naked eye. It's usually worth investing in a sensor loupe (below), which combines a magnifying lens with small lamps which illuminated the sensor surface.
If you send your camera away to be professionally cleaned, the technicians will be using the same materials and techniques we're describing here. Hopefully, they'll have the benefit of experience and will do a better job than you could, though you can't always rely on that.
One final word of warning. If you scratch your sensor when cleaning it, it's your responsibility and you will have to pay for a repair, whether or not the camera is still within its warranty period.
ISO | High ISOs are fine on SLRs, terrible on compacts
ISO is the measure of a sensor’s sensitivity to light. The numbers are the same as the ISO ratings given to traditional film. The difference is that a film only has one fixed ISO, while you can change the ISO of your sensor from one shot to the next. ISO values go in the following sequence (some cameras offer intermediate values too):
100 • 200 • 400 • 800 • 1600 • 3200 • 6400 • 12800
Each ISO value is twice the sensitivity of the one before, which makes exposure calculations more straightforward because this is the system used for shutter speeds and aperture settings too.
You can increase the ISO in poor light so that you don't have to use slow shutter speeds and risk camera shake. In full auto mode, digital cameras will adjust the ISO automatically with this in mind.
The disadvantages of higher ISOs on digital cameras are not unlike those of high-speed film. You get more noise (similar to film grain) and reduced definition.
The amount of noise you get is directly related to the size of the sensor and the number of megapixels. The small, high-resolution sensors in compact digital cameras produce much more noise at the same ISO than the larger sensors in digital SLRs.
It's like turning up the volume on an old audio cassette because the music is quiet. The music gets louder, but so does the background hiss, and the overall quality is pretty poor.

You can see that in this example where a small section has been blown up to show the image quality at ISO 100 (left) and ISO 1600 (right). Compact camera makers are constantly increasing the maximum ISO values on their cameras, but only at the cost of plummeting picture quality - no matter what the claims!
The two big problems are small sensors and high megapixels ratings. That's why digital SLRs are so much better at high ISOs than compacts. The sensors are far larger, yet the megapixel ratings are much the same.

Nikon's D3 and D700 are perfect examples. Both have full-frame sensors, but 'only' 12 million pixels. The results is truly astonishing high-ISO performance. The picture above was shot at ISO 6400, yet the enlargement shows that the picture quality is still excellent, with very little noise.
100 • 200 • 400 • 800 • 1600 • 3200 • 6400 • 12800
Each ISO value is twice the sensitivity of the one before, which makes exposure calculations more straightforward because this is the system used for shutter speeds and aperture settings too.
You can increase the ISO in poor light so that you don't have to use slow shutter speeds and risk camera shake. In full auto mode, digital cameras will adjust the ISO automatically with this in mind.
The disadvantages of higher ISOs on digital cameras are not unlike those of high-speed film. You get more noise (similar to film grain) and reduced definition.
The amount of noise you get is directly related to the size of the sensor and the number of megapixels. The small, high-resolution sensors in compact digital cameras produce much more noise at the same ISO than the larger sensors in digital SLRs.
It's like turning up the volume on an old audio cassette because the music is quiet. The music gets louder, but so does the background hiss, and the overall quality is pretty poor.

You can see that in this example where a small section has been blown up to show the image quality at ISO 100 (left) and ISO 1600 (right). Compact camera makers are constantly increasing the maximum ISO values on their cameras, but only at the cost of plummeting picture quality - no matter what the claims!
The two big problems are small sensors and high megapixels ratings. That's why digital SLRs are so much better at high ISOs than compacts. The sensors are far larger, yet the megapixel ratings are much the same.

Nikon's D3 and D700 are perfect examples. Both have full-frame sensors, but 'only' 12 million pixels. The results is truly astonishing high-ISO performance. The picture above was shot at ISO 6400, yet the enlargement shows that the picture quality is still excellent, with very little noise.
APS-C sensors | The new standard?
Digital SLR and hybrid camera sensors come in a number of different sizes, but the most common is the APS-C format. This is about half the area of a full-frame sensor or a 35mm film frame, and gets its name from the APS-C format film cameras that were popular just before the digital revolution.
Most amateur and enthusiasts' digital SLRs use the APS-C format, and full-frame sensors are generally reserved for much more expensive professional models. The latest advances in sensors mean that the quality of images from APS-C format cameras can be very high indeed, though these same advances also benefit full-frame sensors, so the gap in quality is still there.

This diagram shows the relative size of APS-C sensors and full-frame sensors. It also illustrates why you have to apply a 'crop factor' or 'focal factor' (1.5x or 1.6x, depending on the exact size of the sensor) when working out focal lengths with APS-C format digital SLRs. For any given lens, they capture a smaller angle of view than a full-frame sensor, which gives the effect of shooting with a longer focal length.
Most amateur and enthusiasts' digital SLRs use the APS-C format, and full-frame sensors are generally reserved for much more expensive professional models. The latest advances in sensors mean that the quality of images from APS-C format cameras can be very high indeed, though these same advances also benefit full-frame sensors, so the gap in quality is still there.

This diagram shows the relative size of APS-C sensors and full-frame sensors. It also illustrates why you have to apply a 'crop factor' or 'focal factor' (1.5x or 1.6x, depending on the exact size of the sensor) when working out focal lengths with APS-C format digital SLRs. For any given lens, they capture a smaller angle of view than a full-frame sensor, which gives the effect of shooting with a longer focal length.
Wednesday, 1 December 2010
Low pass filter | Your sensor is protected!
Low pass filters are placed directly in front of sensors to reduce the incidence of interference or moire effects. They also act as a useful protection for the sensor surface, and on some cameras the low pass filter can be vibrated to dislodge dust particles.
In fact when you look at a sensor, it's the low pass filter you see, not the sensor surface itself. It's the low pass filter which collects the dust and smears in a digital SLR, and it's the low pass filter you're cleaning when you remove it.

This is a photograph of the Panasonic GF1. What you see through the lens throat is the surface of the low pass filter, and the sensor surface itself is completely covered by it. This camera has a dust removal system which vibrates this low pass filter to remove any dust. The filter prevents the dust reaching the sensor itself. The GF1 isn't a digital SLR, but the principle of the low pass filter is the same on D-SLRs.
This means, incidentally, that sensor cleaning is not necessarily the terrifyingly hazardous process that the camera manual may suggest. You're not cleaning the super-delicate silicon surface of a chip containing millions of microscopic photosites, but an altogether more robust optical filter in front of it. It's still possible to scratch the surface of a low pass filter, of course, especially since they're so hard to get to, but if it's approached carefully sensor cleaning should be quite safe.
Low pass filters are needed because sensors use rectangular arrays of photosites and if you're photographing a subject whose detail includes a fine rectangular mesh of a similar pitch (iron railings in the distance, maybe, or woven fabrics), there's a good chance of interference effects which appear as tiny colour fringes and artefects in the image.
Low pass filters are necessary, then, but they have a side-effect. They work by slightly blurring very fine detail, and this is one of the reasons why digital images always need some kind of sharpening, which usually takes place in the camera and sometimes again when they're being edited on a computer.

This is illustrated by this photograph taken with a Nikon D50. The strength of the low pass filter in the D50 is unusually low, and the result was that this camera's rendition of fine detail exceeded any other 6 megapixel cameras of the time. The bad news was that some subjects would produce interference/moire effects, visible here as diagonal stripes in the railings on the side of the pier.
In fact when you look at a sensor, it's the low pass filter you see, not the sensor surface itself. It's the low pass filter which collects the dust and smears in a digital SLR, and it's the low pass filter you're cleaning when you remove it.

This is a photograph of the Panasonic GF1. What you see through the lens throat is the surface of the low pass filter, and the sensor surface itself is completely covered by it. This camera has a dust removal system which vibrates this low pass filter to remove any dust. The filter prevents the dust reaching the sensor itself. The GF1 isn't a digital SLR, but the principle of the low pass filter is the same on D-SLRs.
This means, incidentally, that sensor cleaning is not necessarily the terrifyingly hazardous process that the camera manual may suggest. You're not cleaning the super-delicate silicon surface of a chip containing millions of microscopic photosites, but an altogether more robust optical filter in front of it. It's still possible to scratch the surface of a low pass filter, of course, especially since they're so hard to get to, but if it's approached carefully sensor cleaning should be quite safe.
Low pass filters are needed because sensors use rectangular arrays of photosites and if you're photographing a subject whose detail includes a fine rectangular mesh of a similar pitch (iron railings in the distance, maybe, or woven fabrics), there's a good chance of interference effects which appear as tiny colour fringes and artefects in the image.
Low pass filters are necessary, then, but they have a side-effect. They work by slightly blurring very fine detail, and this is one of the reasons why digital images always need some kind of sharpening, which usually takes place in the camera and sometimes again when they're being edited on a computer.

This is illustrated by this photograph taken with a Nikon D50. The strength of the low pass filter in the D50 is unusually low, and the result was that this camera's rendition of fine detail exceeded any other 6 megapixel cameras of the time. The bad news was that some subjects would produce interference/moire effects, visible here as diagonal stripes in the railings on the side of the pier.
Back-illuminated sensors | Better, but only a bit
This is a new type of 'reversed' sensor design which aims to improve sensitivity or the quality which can be achieved at high ISOs. It's currently appearing in higher-quality compact cameras instead of conventional CCDs and their ever-increasing megapixel counts.
The problem with conventional 'frontside illuminated' (FSI) sensors is that between the microlenses and RGB filter on the surface and the photoreceptors themselves is a layer of circuitry which restricts the angle and amount of light passing through to the photoreceptors. This diagram, from sensor manufacturers VisEra Technologies, shows how the 'backside illuminated' (BSI) design gets round this.

The term 'backside' suggests that the sensor is illuminated in some way from the rear, but that's misleading. What's actually happening is that the microlenses and RGB filters are staying where they are, but the circuit and photoreceptor layers are reversed, so that the photoreceptors are now at the front.
In this position, they're not blocked by the layer of circuitry, which has two main advantages:
• The photoreceptors can be (a little) larger, which means higher sensitivity and reduced noise
The problem with conventional 'frontside illuminated' (FSI) sensors is that between the microlenses and RGB filter on the surface and the photoreceptors themselves is a layer of circuitry which restricts the angle and amount of light passing through to the photoreceptors. This diagram, from sensor manufacturers VisEra Technologies, shows how the 'backside illuminated' (BSI) design gets round this.

The term 'backside' suggests that the sensor is illuminated in some way from the rear, but that's misleading. What's actually happening is that the microlenses and RGB filters are staying where they are, but the circuit and photoreceptor layers are reversed, so that the photoreceptors are now at the front.
In this position, they're not blocked by the layer of circuitry, which has two main advantages:
• The photoreceptors can be (a little) larger, which means higher sensitivity and reduced noise
• They can accept light at greater angles (chief ray angles - 'CRAs'), which means less vignetting and the potential for wider-angle lenses, better zooms and higher maximum apertures.
Backside illuminated sensors are already appearing in compact digital cameras, like Nikon's CoolPix P100, for example. But while they have a clear theoretical advantage, the results from the Nikon and other 'backside illuminated' cameras suggest that the improvements may be too small to see except in laboratory tests. This is because they tiny sensors in compact cameras have very clear performance 'ceilings' related not just to the photoreceptor size but to fundamental lens design issues and basic optical physics too.
Backside illuminated sensors could prove much more interesting if they reach the digital SLR market, though.
Backside illuminated sensors are already appearing in compact digital cameras, like Nikon's CoolPix P100, for example. But while they have a clear theoretical advantage, the results from the Nikon and other 'backside illuminated' cameras suggest that the improvements may be too small to see except in laboratory tests. This is because they tiny sensors in compact cameras have very clear performance 'ceilings' related not just to the photoreceptor size but to fundamental lens design issues and basic optical physics too.
Backside illuminated sensors could prove much more interesting if they reach the digital SLR market, though.
Subscribe to:
Posts (Atom)